


Making a Circuit Board Website Layout in Photoshop – Page 3 of 4
This page of the tutorial covers the creation of a resistor.
5 – Creating a resistor
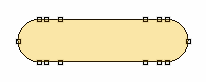
 Set the foreground colour to a tan colour (I used #FEE7A9.) Use the Rounded Rectangle Tool (with the Radius set to 20px or more, and Shape Layers selected, at the top left of the screen), to make a shape as shown.
 Select the Freeform Pen. Ctrl+Click on the shape, and then Ctrl+Click on the edge of the shape, so that the points appear. Click on the path (line) to add more points, until your shape looks like the diagram.

6 – Warping the path
To select a point, Ctrl+Click on it. To nudge it around, use the arrow keys.
Nudge the four innermost points down or up by about 9 pixels. Nudge the two end points in by 3 pixels.
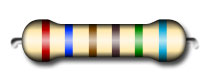
7 – Adding bands, leads, and effects
 Type a series of bars (next to the backspace key), with spaces between them. Use the Character Palette to change their spacing and width. Give each one a different colour. (On a real component, these colours represent numbers. Here, they're just decoration, so feel free to choose any colours you like.)
 Create a new layer set, and pile all the pieces of this component into it.
In the Layers window, make sure the layer of the coloured bands is directly above the tan-coloured shape layer. Press Ctrl+Alt+G, to make the coloured bands layer a Clipping Mask. (A Clipping Mask doesn't extend outside the layer below it.)
Right-click the Shape Layer, and add some Blending Options.
- Drop Shadow
- Inner Glow (Blend Mode: Normal. Colour: Black. Size: 6px.)
- Gradient Overlay (Blend Mode: Hard Light. Opacity: 70%. Reverse: Ticked. Style: Reflected.)
 Create a new layer.
 With a solid, round, size 6 brush, draw in two downward-turning leads, as shown. (I used colour #ACACAC here.) You can pick the brush from the Brushes window (F5, or Window > Brushes), and can easily change its size by pressing [ or ] .
In the Layers window, drag this layer below the Shape Layer, and give it some Blending Options.
- Bevel and Emboss (Depth: 50%. Gloss Contour: Ring.)
