Beginners' Guide to Adobe Photoshop – Page 3 of 4
Colouring Your Selection

7 – Choosing a colour
Now that you know how to select an area in Adobe Photoshop, we can look at some tools that can do something with that area.
Before we get started on colouring your selection, you'll need to pick a colour.
This part of the Toolbox is where you select your colours.
The top square is the foreground colour. If you use a brush or paint bucket, it will apply this colour.
The bottom square is the background colour. It has various purposes, but it's also a good place to store a second colour that you're using.
Click on either square to change its colour.
Click the arrow to swap the two colours.
Click the little squares to reset the colours to black and white.

8 – The Paint Bucket and Gradient tools
These two tools share a button on the toolbar. To select one, click and hold.
 On a new layer, just click the Paint Bucket tool inside the area of your selection to fill it with the colour you've selected.
 Click and drag from one area to another to fill the area. The point where you started to click will be the colour of your foreground colour, and the point where you took your finger off the mouse button will be the colour of your background colour. The area in between will gradually change from one colour to the other.
In this case, I went from corner to corner, with the default white and black selected.

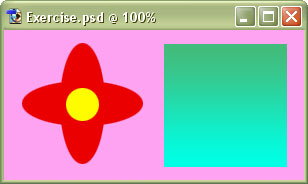
9 – A colour exercise
With what you've learned so far, you should be able to recreate this piece of hippy history. :)
Remember to create each step on a new layer.
Other Adobe Photoshop tools of interest include
 The Text Tool – Just click it wherever you want text to appear. Choose a font, colour, and size, and start typing.
 The Move Tool – Use this tool to drag things around. If you have a selection, it will drag the contents of the selection. If not, it will drag the contents of the layer you're on.


