


"Splat" Website Layout
By using a few gradients, and applying the Wave filter, it's possible to make this simple website layout.
I'd recommend you make this layout 720x720 pixels. I've made it smaller here, due to space constraints. (Using Photoshop is very hard in space :)
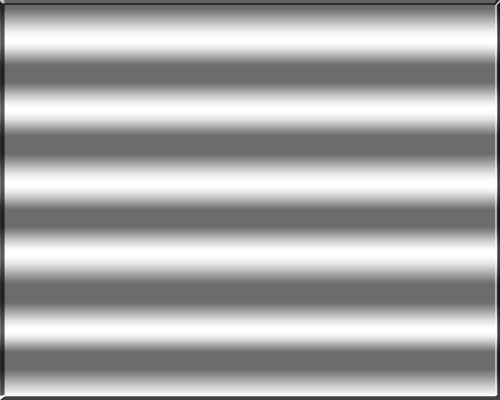
1 – Creating a wavy gradient
 Choose the Gradient Tool. (Remember that it might be hidden under the Paint Bucket Tool.) A little coloured bar, representing the gradient, will appear at the top left of the screen. Click on it. (In Photoshop 5.5 or earlier, click Options Tab > Edit.)
Add black and white tabs across the bar at the bottom of the screen, such that the gradient alternates between black and white.
Apply this gradient from the top of the screen to the bottom. Hold Shift while you drag to keep in exactly vertical.
To soften the gradient, click Image > Adjustments > Brightness/Contrast. Reduce the contrast a fair way, and increase the brightness slightly. You want the area to look like shiny metal.
Right-click this layer in the Layers list, and choose Blending Options (Effects in Photoshop 5.5.) Add a Bevel.

2 – Adding the Splat
 Create a new layer.
 Choose the Selection Tool, and use it to select a large, rectangular area.
 Fill the area with a medium green.
Press Ctrl+D to deselect the area.
Click Filter > Distort > Wave. Set the sliders, and click "Randomize" a few times, until the edges of your rectangle are rippled nicely.
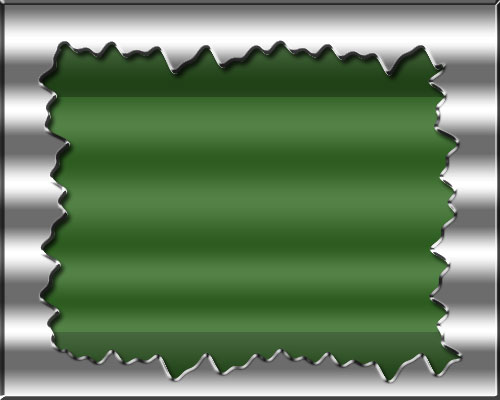
3 – Giving the splat some effects
Ctrl+Click this layer in the Layers list, to select its outline.
Choose the Selection Tool again. Hold Alt (this subtracts from your selection) and select all of your existing selection, except for the very top and bottom.
All that should be selected is the very top and bottom of the green area. Press Ctrl+U to bring up the Hue/Saturation box. Reduce the lightness slightly, and press Ok.
Right-click this layer in the layers list, and choose Blending Options (Effects in Photoshop 5.5.) Add an Inner Shadow, an Outer Bevel (set the Gloss Contour to "Ring", and turn on Contour), and a Gradient Overlay (change the gradient to a black-white banded gradient like before, and set the Opacity to 15%.)
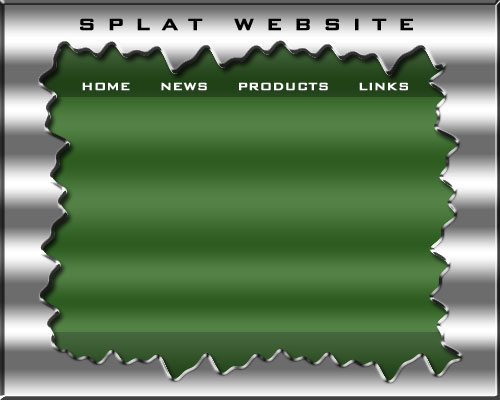
4 – Adding text and creating a sliver
Put in some text for your header and buttons. Set the tracking (spacing) of the text to 500 or more. If you can't see this option, click Window > Character. It's the "A V" box on the Character Palette.
I've used the Bank Gothic font. Click here to download this font if you want to use it.
As it is, this website will be tall enough to be a web page, but not wide enough. To solve this problem, you'll need to make a "sliver". A sliver is my term for a thin piece of an image that can be repeated indefinitely to fill an area of variable size.
 Choose the Slice Tool, and cut the image up into four pieces — the big green area in the centre, the very left and right bevelled edges (which you don't need), and a very thin vertical piece of the silver background. (This is your sliver)
|
5 – Organising your web page
In your web editor, create one big table, with a width of 100% and a height of 720px. set your sliver image as the background of this table.
Remember to set the borders, spacing, and padding of this table to 0.
Inside the big table, create another table exactly the same size as your green splatty image (this should be 720px tall, and around 700px wide.)
Set the "splat" image as the background of this table.
You can now add your own text to this area. Don't introduce new colours. Stick to black and white.
To make your big links at the top functional, put a series of green underscores under each one, and turn the underscores into links. You may also need to change your page's "visited links" colour from purple to green to keep the underscores invisible.
