


Creating a Web Page Header in Photoshop – Page 3 of 3
The last page of the tutorial covers adding the buttons and header text.

12 – Creating a button layer
In the layers list, Ctrl+Click on your gold layer to select it. Create a new layer and drag that new layer almost to the bottom of the layers list.
 Select a colour (I've chosen orange here) and fill the area with the Paint Bucket.
 Select the Move tool and press the down key several times to move the layer downwards.
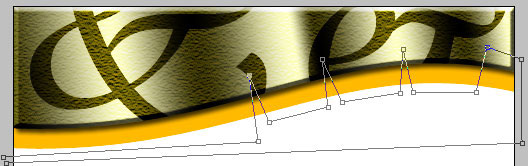
13 – Making notches with the Freeform Pen Tool
 Press Shift+P to switch to the Pen Tool. Make a series of points as shown, simply by clicking to place the points. Photoshop will connect them with straight lines.

14 – Cutting the Selection
Right-click the line you've made, and select Make Selection. Press Delete to cut the selected area, leaving you with these buttons. Press Ctrl+D to deselect the area.

15 – Putting text on your buttons
 Using the text tool, put in some black text on each button. With a short amount of text, you can just rotate it slightly (press Ctrl+T) instead of trying to use curve effects on it.

16 – Inserting some header text
Add in some header text, in white. It looks nice as it is, but due to the varying darkness of the header image, some parts of the text don't show up properly.
 On the layers list, Ctrl+Click on the gold layer to select it, choose the Selection Tool, then hold Alt and drag the cursor across the top of the selected area, to cut the top off the selection, then do the same for the bottom, leaving just a band.

17 – Making the semitransparent band
Create a new layer at the top of your layer list and reduce its opacity to 30% or as much as you feel is necessary.
With the Paint Bucket tool, fill the area with black.
Save the picture For the Web (on the File menu) as a jpeg with quality 60. In your web page editor, select the Hotspot tool and draw an area over each button to turn them into links.
That's it! :)
