


Making a Nebula by using Difference Clouds
I have found very few uses for the "Difference" layer option. This is an exception. I've used this technique to make some nice wallpapers, which are available at the bottom of the page.

1 – Creating Clouds
In Adobe Photoshop, make a new image, the same size as your screen resolution (I used 1024 x 768).
Choose the colours black and white (if they're not already selected), and click Filter > Render > Clouds.
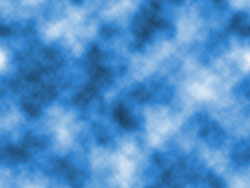
2 – Making the clouds blue
In the Hue/Saturation properties (press Ctrl+U to access them), select "Colorize", and move the Hue slider until the clouds are a realistic blue colour.
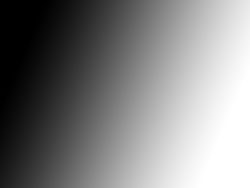
3 – Creating the Gradient layer
 Make a new layer above the last one.
 Use the Gradient Tool to put a black-white gradient across it.
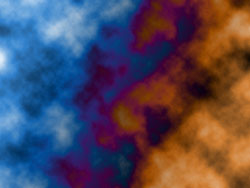
4 – It's O.K. to be different :)
Click on the layer Mode (where it says "Normal"), and change it to "Difference".
This is the Help File explanation of what's happened:
Difference looks at the color information in each channel and subtracts either the blend color from the base color or the base color from the blend color, depending on which has the greater brightness value. Blending with white inverts the base color values; blending with black produces no change."
Essentially, what has happened is that where your gradient layer is black, nothing happens (note that the clouds at the left are the same as the clouds you had before, because the gradient is basically black).
However, where your gradient is white, the clouds are inverted, with the blue areas becoming orange, and the white areas becoming black, which looks a lot like fire and smoke.
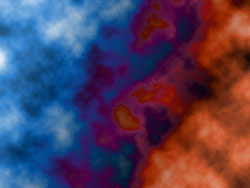
5 – Changing orange to red
The final step is to change the orange to red. (Of all the combinations, blue and red looks far more appealing and realistic than the others.)
Merge the gradient layer with the cloud layer, by clicking the gradient layer, and pressing Ctrl+E. (This is done because you only want to colour-shift the orange part of the image - if you don't merge, you can't alter the orange part, because there is no orange part, it's just those same blue clouds hiding under a difference filter. You can try, and your orange area will go red, but your blue area will go green at the same time.) :)
After having merged the layers, bring up the Hue/Saturation options again (Ctrl+U), and select "Reds" on the menu. Adjust the Hue, Saturation and Brightness just a little bit, until the orange clouds have gone a reddish colour. (Don't move the sliders more than a touch - if you try to get a pure red colour, an unsightly line will appear.)
If you want to do something psychedelic, just go to Master (not Reds) on the menu, and shift both colours - you can make pink and green clouds if you like. :)
This is a link to a full-screen nebula. It makes a great desktop background. Click on the link, and right-click the image when it appears.
