Modern Web Design Style
IMPORTANT: This tutorial is about the graphic design of a website. Please see Website Setup Guide for my basic guide to setting up a website.
For this tutorial, I'm taking a temporary departure from realistic lighting, smooth bevelling, metallic effects, and soft shadows... :)
Welcome to a world of sans-serif fonts, monocoloured areas, objects that don't cast shadows, colours that don't contrast, and text saved as picture files.
Modern-style web design, has become the most common form of web design these days. It presents web page elements not as realistic images, but as neatly arranged diagrams.
This tutorial goes through the steps to making a website in this style.

1 – Creating some header text
 Choose a sans-serif font (a font with no curly bits), such as Verdana and write a title. Don't put a space between the words - just make the first word bold and the second word grey.
In Adobe Photoshop 5.0, you'll have to use the text tool twice - once for each colour. In Adobe Photoshop 6.0 and 7.0, you can just select the second word and change its colour.
Click File > Save for Web. Choose Jpeg, Quality 60. Do this for every image in this tutorial.

2 – Creating the menu
 Create a thin image like this one and fill it with the colour of your choice. (This orange contrasts with both black and white.)
To help cut up the large orange area, it's good to create a lighter watermark area.
 Make a new layer with Opacity set to 20%.
 To make the shape I've made here, select an oval-shaped area. (Hold down on the Rectangular Selection Tool to get the Elliptical Selection Tool.)
 Then, to extend the selection downwards, hold shift and select a rectangular area .
Fill the area with white.

3 – More watermarking, and some text
Right-click on your watermark layer, and select Duplicate Layer.
Click the new layer in the layer list.
 Select the Move tool. Press Shift+Down Arrow about ten times. Holding shift makes the item move much further with each press.
Put in some white menu text, again in a sans-serif font. White doesn't contrast very well with orange, but it's still readable.


4 – Colourful titles
Create a new, small, rectangular image as shown.
Fill the image with a new colour.
Put in some sans-serif (non-curly) white text.
Click File > Save for Web, then change the text, then change the colour (by pressing Ctrl+U to bring up the Hue/Saturation sliders.)


5 – Picture icons
Choose a few pictures that are relevant to your site, or to something new that's on your site.
 With the Crop Tool, start selecting an area of your image, then hold Shift, to make your selection square. (In Adobe Photoshop 7.0, press Enter once you're happy with the area you've selected.)
Click Image > Image size, and set the size to about 70x70.
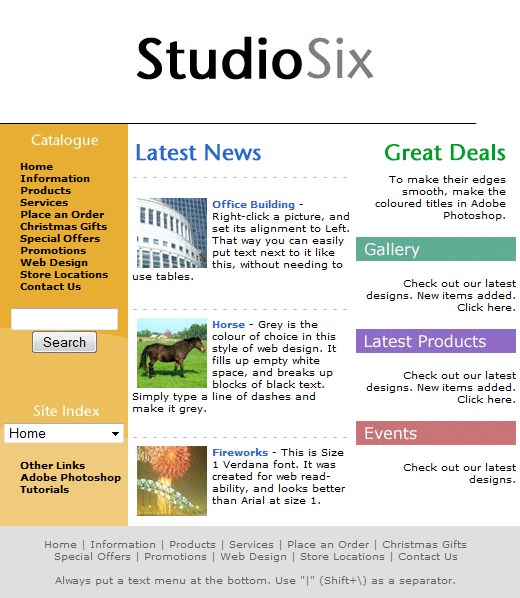
2: Cell width = the width of the menu image. (Right-click this cell.) Background colour = colour of bottom of menu image. Cell alignment = Top (Right-click this cell.) Create a new table in this cell, with width and height equal to that of your menu image. |
1: Create a 3-cell table - width 630 pixels. No borders or cell spacing/ padding. Right-click it the table and set the background colour to white. Cell width = 630 pixels minus the width of the left cell and the right cell. |
3: Cell width = the width of the menu image. Cell alignment = Top |
|
Put another table here, to put your text links in. |
6 – Making a web page from the pictures
(These instructions are accurate for Microsoft FrontPage, but other editors should be very similar.)
Insert your title image above this table. Right-click the page, choose Page Properties, and set the background colour to a dark colour.